Reset subscriber grid layout

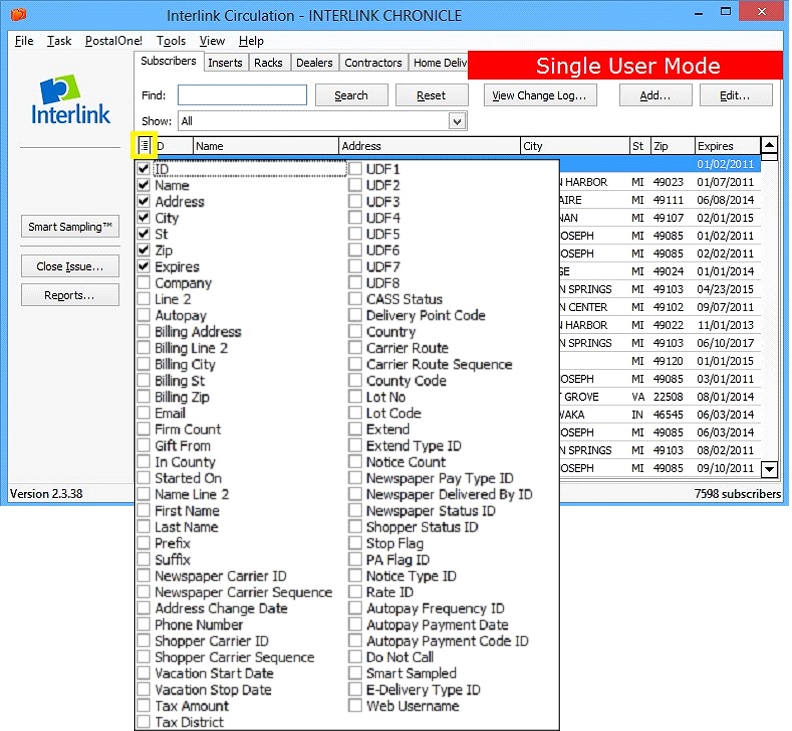
When using Circulation, you may decide you want different information to appear on the subscriber list, such as email addresses, CASS statuses, company name, etc. You may select these options from the main menu (highlighted in yellow).

To reset the rows back to the original, default setting, simply go to View > Reset Subscriber Grid Layout and the subscriber screen will return to the default view.
default view


Benefits and savings of ACS electronic notification for Full-Service mailers

ACS is a post-mailing service that allows mailers to electronically receive notifications of change-of-address (COA) or other non-delivery notifications. Electronic notifications reduce the number of manual (hardcopy) address notifications.

ACS has many benefits over manual address corrections

ACS is a cost-effective, efficient means of obtaining accurate COA or reasons for non-delivery, and utilizing ACS can:

  1. Reduce manual address costs
  2. Reduce labor-intensive address change functions by eliminating returned mail
  3. Allow the mailer to choose to receive fulfillment of time-sensitive information on a daily, weekly, or monthly schedule
  4. Retrieve address change information electronically via a secure Internet site to allow automated updating of mailing lists.
  5. Allow the mailer to receive notifications relating specifically to their address files

Interlink customers who want to receive ACS need to configure Circulation to be a Full-Service Mailer by following the steps below:

  1. Open Circulation and click Tools | Properties Editor
  2. Then find “Use Full-Service ACS with Periodical (or Standard) Mail?” property depending on your type of mailing
  3. Double click the property “Use Full-Service ACS…”, and check the box within the property
  4. Click OK, and then Close
  5. Then log into your Business Customer Gateway
  6. Click Mailer ID (typically located on the right) or it can be found in the Mailing Services screen
  7. Click MID Tools, and then select Program options
  8. Check Full-Service ACS, and uncheck Confirmation Services for Package Service Products and Extra Services
  9. Click OK

To access the ACS information:

  1. Log into your Business Customer Gateway account at https://gateway.usps.com/bcg/login.htm
  2. Look to the left of the screen and click on the “Mailing Services” link
  3. Locate the “Mailing Reports” link and click on “Go To Service”
  4. On the next screen, look under the “Full-Service” section and click on “Data Distribution/Informed Visibility Dashboard”
  5. The next screen will provide you with your options for downloading the ACS Reports. Report 3 is the Full-Service ACS Change of Address (COA) Report

Note: An ACS enrollment form is not required for Full-Service ACS.

Create a backup of your Circulation list

Interlink recommends making a backup of your list to safeguard against instances of damaged lists, computer crashes, and other circumstances. Backing up the list provides an extra “layer” of protection should anything happen to your computer.

To create a backup to a hard drive, flash drive or other device…

  1. Open the list that you want to backup
  2. Go to FILE and select BACKUP LIST
  3. The program will then open up a window that allows you to choose where you want to save the backup
  4. Select the correct location, click SAVE, and your backup will then be saved in your chosen location

You can also choose to send a backup to Interlink’s server…

  1. Open the list that you want to backup
  2. Select File, and then Service List
  3. This process replaces the backup file on Interlink’s server with a new one
  4. To restore this back up, you will need to go to File, then “Restore list from Interlink”
  5. A “Choose List Backup to Restore” window will open where you may select the list you want to restore
  6. Click OK to restore the backup list from Interlink

The list will open once the transfer is complete.

If you have any questions about creating a backup or restoring a backup list, please call Client Solutions at 888-473-3103 for assistance.

IMb Tracing for newspapers

IMb Tracing is a service offered by USPS that provides newspapers with near real-time tracking, and gives advance information about when papers will reach their destinations.

The USPS believes IMb Tracing allows newspapers and advertisers to:

  • Ensure delivery within in-home dates
  • Know when advertising messages reach the target audience
  • Track success rates for direct mail
  • Synchronize multi-channel marketing
  • Improve ad response rates
  • Improve customer acquisition and loyalty

Before receiving the benefits of IMb Tracing, you must apply with the Postal Service to be an IMb Tracing Subscriber which may take several weeks.

Most of the application is general contact information, while sections two and three request Mailer ID and STID, and some technical information. Follow the link to complete the IMb Tracing application.

https://www.usps.com/mailtracking/_pdf/application.pdf

The Mailer ID can be found in the Business Customer Gateway on the Mailer ID menu, and the STID will depend on your mailing configuration and are as listed in the table below:

Periodical Standard
Basic IMB Tracing 044 301
FS IMB Tracing 274 271
FS ACS and IMB 045 143


The next step is to go to mailtracking.usps.com and click “Sign Up” under New Users. Once you have completed the sign-up process and have submitted your application, USPS will contact you and request sample barcoded mail pieces be submitted for review.

To create sample barcoded pieces, open Circulation and:

  • Click Tools, then Properties Editor
  • Type “Tracing” into the search box
  • Select the property that applies to your mailing, and place a check in the check box
  • Select OK, and OK, again

The next time you close issue, your labels will have the proper STID. You will send the labels by mail or email to the contact information provided to you by USPS.

Once USPS approves your IMb Tracing subscription, you will receive your IMb Tracing benefits and will be able to view your data on the Mail Tracking & Reporting Website.

You also can receive your raw scan data directly from USPS several times each day.

As the USPS processes mail, scan data records are created each time mail pieces are sorted. You can predict the delivery time of your mailpiece, based on the information you receive from the scan data
Configure Destination Delivery Unit (DDU) in Circulation

The USPS offers discounts for depositing Carrier Route mail at the facility responsible for delivery to the final destination of those pieces. The term used to describe this facility is Post Office of Entry, or POE.

However, additional discounts may be available for depositing mail at other facilities responsible for delivery of your mail other than your POE. In addition to lower rates, delivery time is often greatly improved when this is done.

The term used for these additional entry points is Destination Delivery Unit, or DDU.

DMM Reference for DDU in Periodical Mail: http://pe.usps.com/text/dmm300/707.htm#wp1164902

DMM Reference for DDU in Standard Mail: http://pe.usps.com/text/dmm300/346.htm#wp1032654

To configure a DDU:

  1. Select “Configure List” from the “File” menu
  2. Under the “Periodical or Standard” tabs, Select Customize Sacks/ Tubs Button
  3. Click on DDU Tab at the top of the window
  4. Click Add to enter each ZIP code where you deposit periodical mail, other than your POE, and click OK
  5. Click Apply & OK, and Ok again to save the changes

These changes will not take effect until after the next time an issue is closed.

Set up an 8125 form for drop shipment

To set up a 8125 form please follow these instructions:

  1. Click on File then Configure List.
  2. Select the Additional Mail Entry button. Click Add.
  3. Enter in Post Office information and change the form type to 8125, and select a mail entry type.
  4. Uncheck the box “Use Post Office of Original Entry” and enter in the name, city, state, ZIP, and plus 4 ZIP of the post office needing the 8125 form. Click OK, and OK again.
  5. Click the Periodical Mail tab, and click the Customize Sacks/Tubs button at the bottom.
  6. Click the DDU tab, and click Add.
  7. Enter the ZIP code of the post office needing the 8125 form, and click OK.
  8. Select the Container Order tab, and click Add.
  9. Enter the ZIP codes, individually, that are going to the post office needing the 8125 form.
  10. Insert “Group Break” after the ZIP codes, highlight the Group Break, and click Edit.
  11. Hit the drop down arrow to change the Mail Entry Point to the post 0ffice needing the 8125 form.
  12. Click OK, OK, and OK again.

This change will take place the next time an issue is closed. The 8125 form will appear on the last page of the postage statement.

Reprint 3541 with new advertising percentage or weight

To change the advertising percentage or weight of a previously printed or entered 3541, please follow these instructions:

  1. Click Reports
  2. Select Current Reports tab
  3. Check Use Advanced Dialogs in the bottom left of window
  4. Choose the 3541 Postage Report, then click Print All
  5. A “menu” of date options will appear
  6. Choose desired date and click Continue
  7. Enter new values in the new box and click Continue

Print a list of subscribers based on ZIP code

To print a list of subscribers based on their subscribers:

  1. Select Reports on the left side of the screen. Click the Current Reports tab.
  2. Select List Analysis as the category and check Totals/Crosstabs.
  3. Click on Print all and Continue.
  4. In the Report Options window set the Row: Zip (5 digit) and Column: NP Status
  5. Click on OK.

Delete subscriber records and old reports

Occasionally, you may want to purge old records from your database. This option is available by first calling client solutions to request the delete feature be turned on, and secondly, by purging old reports.

To delete subscriber records from Interlink Circulation, you must first call client solutions to request the feature be turned on. Upon this request, a client solutions representative will email you a Delete Authorization Form. This form informs the customer that once they have deleted a record it cannot be undone, and deleting records can affect Earned Income in Interlink Circulation. Upon receiving the completed form, a representative will e-mail you to confirm when your account has been updated.

Please note that this may take a few hours to complete, and the signature must be of the Publisher or Circulation Manager. Once the customer has signed and returned the form, the feature is turned on. Please allow 30 minutes for ‘synchronization’, at which point you should ‘close’ the Interlink Circulation program and re-open. You should then have the ‘option’ to DELETE subscribers as you see fit. Customers may prune or delete old reports from their list to help keep their list tidy. To remove old reports from Interlink Circulation, please follow the directions below:

INSTRUCTIONS:

  1. Open List
  2. Select Task and Prune Records
  3. A window will open that shows when the last pruning was completed. This window also shows which reports will be removed and from what dates. PLEASE READ THIS CAREFULLY.
  4. If you still wish to delete reports, click Prune.

Please note that Interlink Circulation automatically prunes reports. If you would like to change the frequency the program prunes reports, please follow the instructions below:

INSTRUCTIONS:

  1. Open List
  2. Select Tools and Properties Editor
  3. Scroll down until you find Properties that say “Prune”
  4. To change the frequency that certain reports are pruned, highlight the property and click on Edit
  5. Change the Value to your desired frequency

*Note: Please be aware that similar to deleting subscriber records, once you have pruned reports they are permanently removed and there is no way to retrieve them. It is advised you use this feature with caution.*

Print post card renewals

Provided below are instructions on how to set up Interlink Circulation to print renewal post cards:

  1. Click on File and Configure List. Select the Subscriptions tab.
  2. Click the Renewal and Expiration Schedule button.
  3. Use the drop down arrow underneath Notification Report Style to select Post Card.
  4. Click on OK, and OK again.

Change Printer Settings

  1. Click on Reports
  2. Click Change Printer Settings
  3. Click the Renewals tab
  4. Select the appropriate printer name
  5. Change the Page Layout to Postcards, 1up, 4×6, perforated
  6. Make sure the correct Advanced Driver is selected, and click OK.

Printing Renewals

  1. In the Reports menu, click Current Reports
  2. Select the Renewals Category and check Subscription Renewals or Subscription Renewals-Manual.
  3. Click on Print All at the bottom.
  4. Enter in the expiration date range of subscribers you wish to send renewals to.
  5. Check any other appropriate boxes and click Continue.