Find subscribers

Finding subscribers in Interlink Circulation is now easier than ever before with increased the speed and the accuracy of lookups:

Birds eye view of your list — The main subscriber screen now shows all of your subscribers by default. By viewing multiple subscribers at the same time, it is easy to scroll up and down through your list to find the right now.

Sorted Columns — Sort by any of the columns visible on the main subscriber screen by clicking on the name at the top. This can be very useful for browsing through the subscribers in your local zip code, or for grouping everyone with a last name beginning with “S”.

Intelligent, comprehensive search — Enter any portion of a subscribers name, address, city, state, zip or phone number into the find box to get a list of all subscribers who match.

This is extremely useful for narrowing down the list of subscribers displayed at any one time. When finished with your search, clear the Find box by clicking the Reset button and the entire list will be displayed.

Examples:

  • A search for “Smith” will return everyone with the last name Smith, everyone on Smith St, and everyone who lives in Smithville.
  • Searching for “491” will show everyone at PO Box 491, everyone in the 49120 zip code, and everyone whose phone number is in area code 491.
  • Searching for “West, James” will probably show that single subscriber.

Tips:

  • Be as specific as possible. Start with 101 Elm St, then if no matches are found, expand your search to just Elm St.
  • Search and sort. If you know the subscriber you are trying to find lives in Sutton, enter that as your search criteria then click the Name or Address column to arrange the results in alphabetical order.
  • The number of matches is shown on the status bar at the bottom of the program next to the total subscriber count for your list.


Subscription Filters — At the top of the subscriber list, click the Show drop-down to show only certain subscribers based on information not visible on the normal list such.

This tool will allow you to quickly view all of the subscribers temporarily stopped, all subscribers who are actively receiving the newspaper, and much more.

Another crafty use is to show only those addresses failing to pass CASS making it possible to quickly correct bad addresses and increase your postal savings.


Unable to submit postal reports through eDoc

While there are several reasons eDoc may not be submitting properly, here are steps you can take to determine the cause:

Make sure you have the most current version of Java installed on your PC by going to www.java.com/en/download.  

Due to issues with USPS PostalOne!®, Full Service is not operable at this time.  To verify in Circulation that Full Service is not currently enabled, follow these steps:

  1. At the top of your subscriber screen, go to PostalOne!®
  2. Choose Configure PostalOne!® Account.
  3. Towards the middle of that screen, you will need to uncheck the “Use Full Intelligent Mail” box if it is currently checked.
  4. Click OK to save changes.

After unchecking the box and saving it, you will need to close the issue with Full Service turned off. Your mailing reports should say Periodical or Standard Newspaper Mailing. If it says Full Service Newspaper Mailing, then the issue was closed with Full Service box still checked.

After you close issue,

  1. Print your mailing reports as you normally would.
  2. Click on the Header (Periodical Newspaper Mailing) of your most recent close issue (it will be highlighted in Blue).
  3. Click Send to USPS button at the bottom of your mailing screen.

If you are still unable to submit via eDoc after following these instructions, you will need to contact the PostalOne!® Help Desk to confirm your Business Customer Gateway account is properly linked to the TEM and Production environment in the Postal Wizard.

USPS PostalOne!® Helpdesk — (800) 522-9085 — select option #3, then #6


Use the Smart Sampling feature

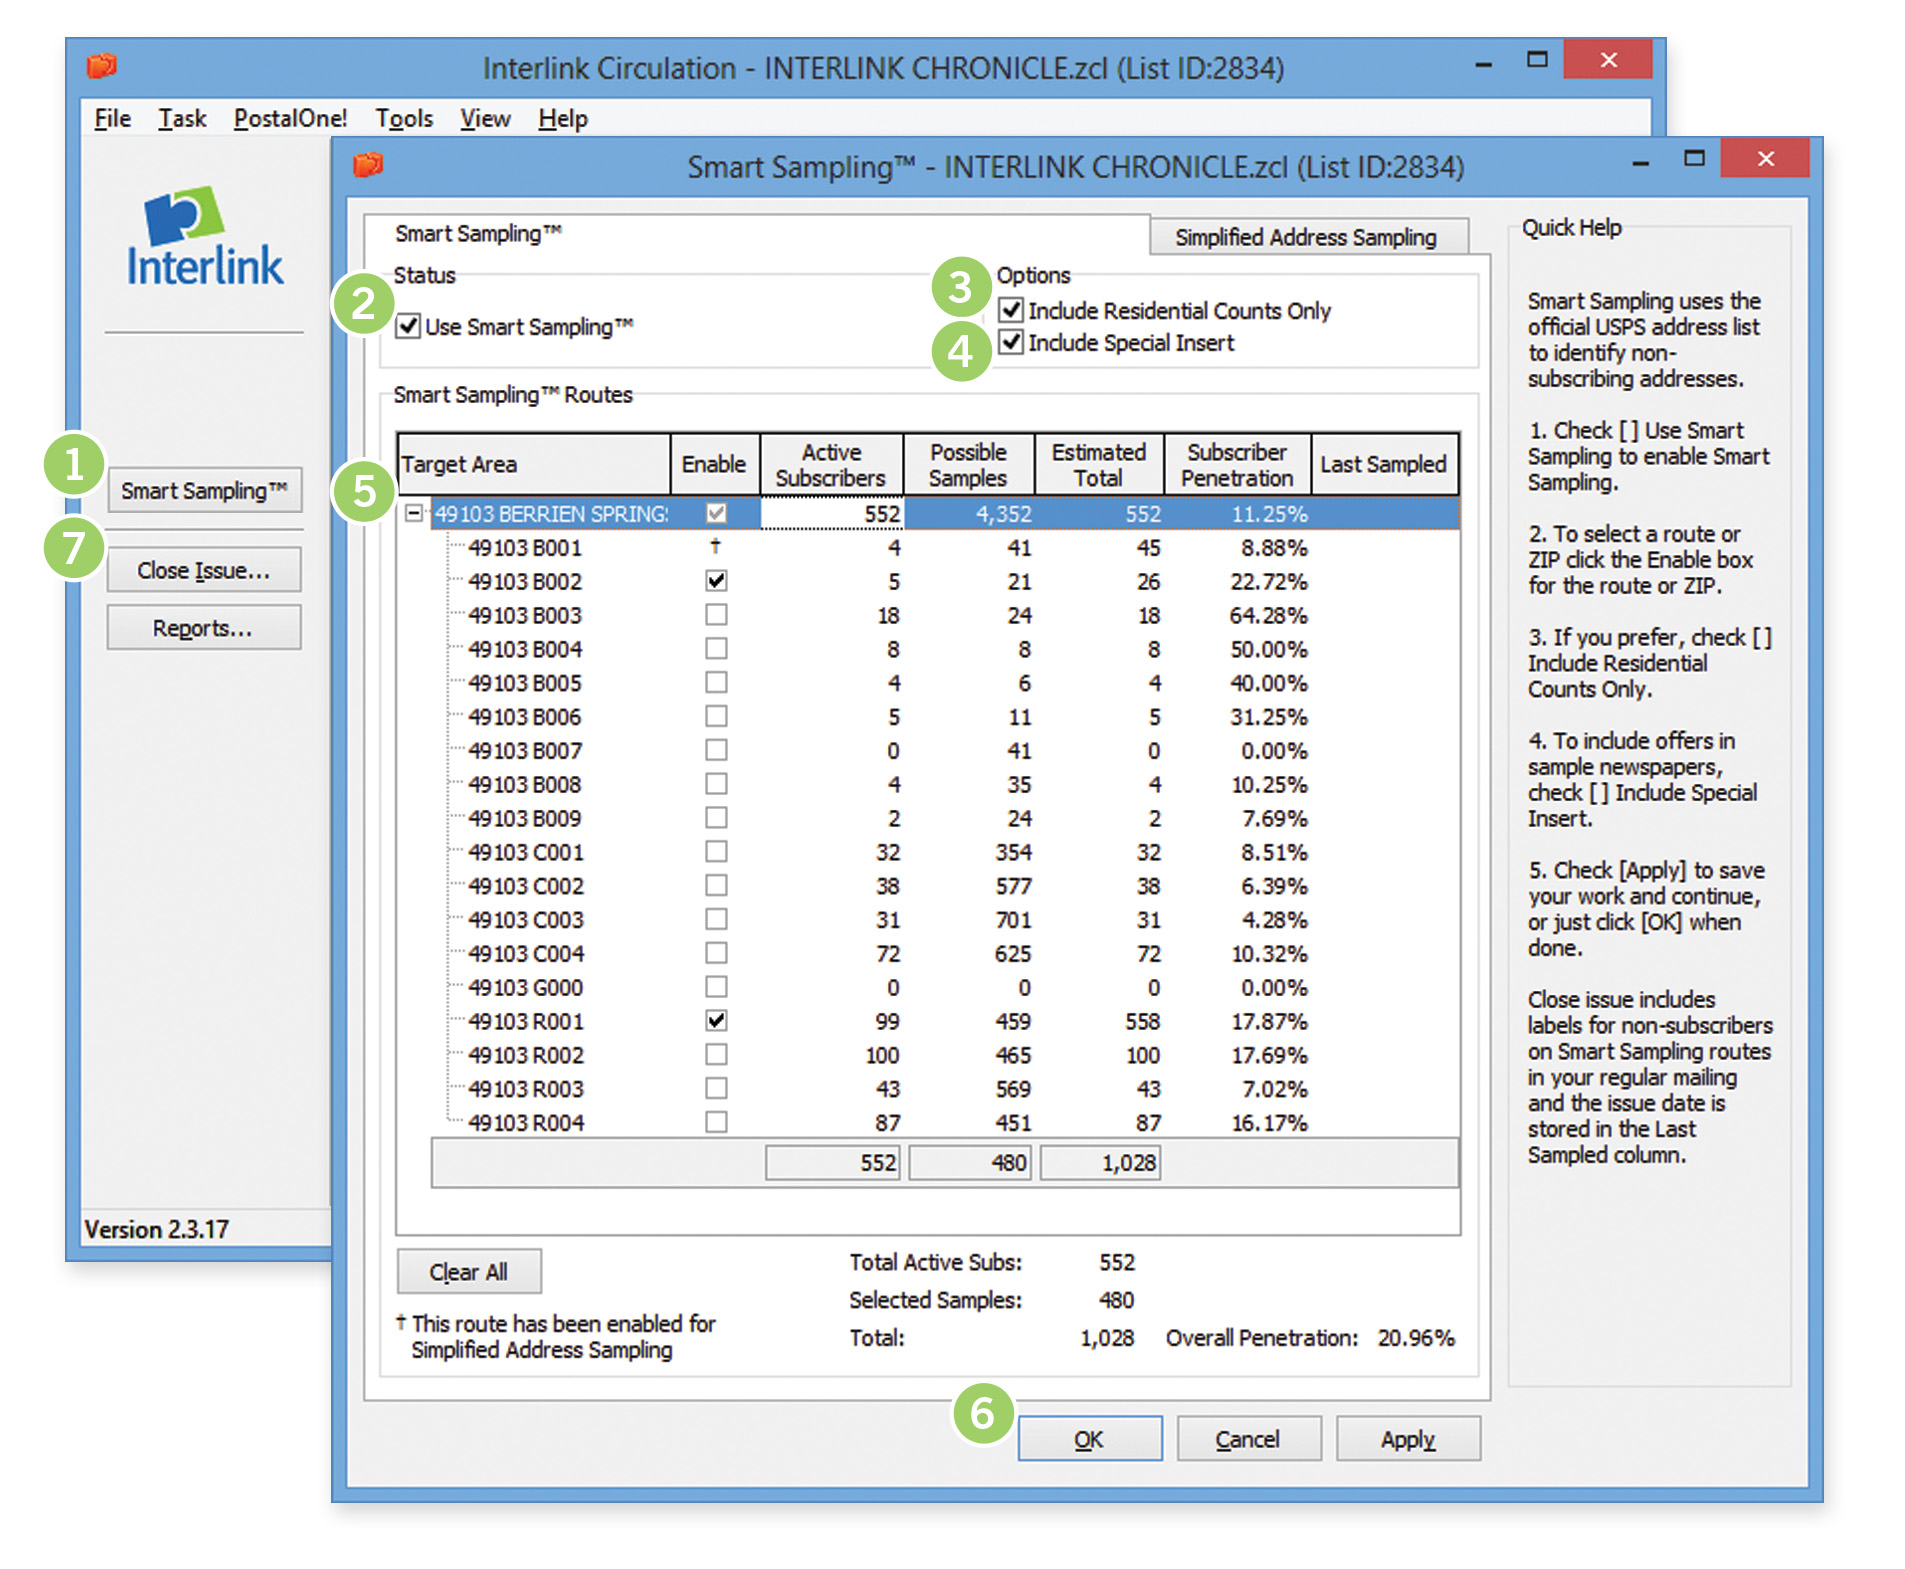
Interlink’s Smart Sampling™ targets growth potential in every market by identifying non-subscribers in your primary ZIP codes so you can directly market to them without disrupting delivery quality for current subscribers.  Traditional bulk saturation sampling simply can’t do that.

To use Smart Sampling, USPS-certified address must first be purchased.  Please contact Interlink for more information and pricing.

To begin using Smart Sampling once the purchased addresses have been attached to your list:

  1. Click the ‘Smart Sampling™’ button on the left side of the open Interlink Circulation screen.
  2. Check the ‘Use Smart Sampling™’ box to enable Smart Sampling.
  3. If you want to only sample residential addresses, check ‘Include Residential Counts Only’.
  4. If you plan to include a special offer or promotional insert in your sample newspapers, select ‘Include Special Insert’ as this will separate your sample subscribers from your paid subscribers.
  5. To sample specific routes within a given ZIP code:
    1. Click the ‘+’ sign next to the ZIP code to expand the selection and display the individual routes available.
    2. Check the box(es) for each route you want to sample*.
  6. Once all desired routes have been selected, view the ‘Selected Samples’ total at the bottom of the screen to confirm it meets your expectations.
  7. When setup is complete, click the OK button at the bottom of the dialog box.
  8. When ready, ‘Close Issue’ as normal.

Once Close Issue has been completed, please print your Statistics Report before you print labels to confirm the mailed copies number has increased as expected.

Until you change your Smart Sampling™ selections, subsequent issues will automatically include sampled copies.

ss-screenshot-numbered


Missing subscriber labels

Determine why a subscriber is not receiving a label

Any of the following items will prevent a label from being printed for a particular subscriber. To ensure a label will print, double-check all possibilities:

  1. Newspaper (or Shopper) status must be Active. This can be found on the Newspaper tab of the subscriber record.
  2. Delivery type must be Mail. This can be found on the Newspaper tab of the subscriber record.
  3. Vacation stop must not be checked. If the Stopped check box on the Vacation tab of a subscriber record is checked, no label will be printed.
  4. “Started” date is in the future. No label will be produced for subscriptions set to begin in the future. This can be found on the Newspaper tab of the subscriber record.

If the newspaper status is Active, Delivery type is Mail, Vacation Stopped is not checked, and the Begin Date is blank or in the past, a label will be produced for the subscription.

Changes to these fields do not take effect until the next issue is closed.

To ensure a label was included with the last issue closed, print a single label for the subscriber in question:

  1. Select the Mailing Labels report
  2. Click the Print Special… button
  3. Select One, Label.
  4. Enter the subscriber ID you wish to check
  5. Click the Continue button
  6. Click the Continue button to begin printing.

If a label prints, then it was included in the set of labels for the most recently closed issue.

If no label prints, check the options above to ensure the subscriber is configured properly to receive a label.

Roll back an Interlink Circulation list

There are some instances when you may need to roll back your list to a previous version. 

Some examples of when you may need to roll your list back include:

  • Issue was closed prior to having all Inserts set up.
  • Issue was closed prior to updating sampling information.
  • Issue was closed with an incorrect weight.
  • Issue was closed without expiring subscribers, as was intended.

Here’s how to roll back an Interlink Circulation list to the last time you closed issue.

  1. From the File menu, select Roll back List.
  2. Confirm the date and time being rolled back to is correct. If so, click Yes, otherwise click No and contact Interlink for further assistance. Note that all changes made to the current Circulation list since the date and time shown will be lost when clicking Yes.
  3. The roll back may take several minutes to complete, at which time the subscriber list will be shown.

Additional Information

The Roll back List option under the File menu is used to take a Circulation list, in its entirety, back to the exact way it was before the most recent issue was closed. In this way, the Roll back list is tied to Close Issue and is sometimes used as a way to “unclose” an issue.

It is important to understand that when a list is rolled back, ALL changes made to the list after the date and time being rolled back to are lost, as if they never happened.

Consider the following example to illustrate how Roll back List works:

  • All new subscribers and payments made for 03/20/2014 issue are entered.
  • Issue for 10/20/2014 is closed.
  • Rack returns from 10/20/2014 issue are entered.
  • New subscriber “Jane Smith” is added to the list, expecting to receive 10/27/2014 issue.
  • Roll back List is used, undoing the closed issue and all changes since.
  • Issue for 10/20/2014 must be re-closed, rack returns must be re-entered and Jane Smith must be re-added to the list, prior to closing the 10/27/2014 issue.

Roll back list simply replaces the current Circulation list with a backup that is created prior to every close issue. Backups are stored in a temporary folder that can be viewed by selecting Explore Temporary Files under the Tools menu.

When rolling back a list, the user is presented with the date and time that the most recent backup was taken, and to what close issue date it relates. It is possible to roll back a list multiple times; however, each time a list is rolled back, recently added information will be lost as the list is rolled farther into the past.


Install or transfer software to a new computer

This article provides detailed information on installing Interlink Circulation or transferring the program, and any associated publications, from one computer to another. Most commonly, this is done as part of a disaster recovery procedure or to facilitate a hardware upgrade. The transfer process involves taking a backup from the first computer, installing Interlink Circulation on the new computer, then restoring the backup to the new computer.

Transfer Circulation

Back up publication(s) from the old computer

Method A
The easiest way to back up a publication is to service the list, which sends a copy to Interlink as an off-site backup. To do this:

  1. Open a list on your old computer.
  2. Select “Service List…” from the “File” menu.
  3. Click the “OK” button when notified that list servicing was successful.

Repeat steps for each additional list you wish to transfer.

Method B
Alternatively you could back up each list to a USB drive or CD-R/CD-RW disk. To back up locally:

  1. Open a list on your old computer.
  2. Select “Backup List…” from the “File” menu.
  3. Select a destination to save the backup file.
  4. Click the “Save” button.

Repeat steps for each additional list you wish to transfer.

_____________________________________________________________________________________________________

Installation of Circulation

Your new computer must be connected to the Internet in order to install Interlink Circulation on it.

Download link: http://interlink.flywheelsites.com/downloads/

When prompted to Run, Open, or Save the file, select Run or Open. If you are not prompted with these options, find the file you just downloaded and double-click to run it. This will begin a download of the latest version of Interlink Circulation to your system. When the download is complete the installation will begin.

  1. Click Install on the first screen.
  2. Read through the Software License Terms and click “I accept…”, then click Next.
  3. After the installation completes, click Finish.
  4. Interlink Circulation is now successfully installed on your system.

Running Interlink Circulation for the First Time

The first time you start Interlink Circulation on the new computer, you will be taken through the Interlink Circulation Getting Started Wizard:

  1. Right Click the circulation icon and select run as administrator.
  2. On the first screen, you will be prompted for login information. Enter your Site ID and Password and indicate if your Internet connection is always available, then click OK. Your Site ID and Password can be sent by e-mail. If you do not have your login information, please contact Interlink and we will provide it for you.
  3. After registering, the program will run a series of tests on your system to ensure compatibility with various functions in the software. If any of the tests fail, please visit the Interlink Circulation Upgrade Support Forum on our website or contact Interlink for assistance.
  4. Once all tests have passed, click Finish to begin using Interlink Circulation.

Restore the publication(s) to the new computer

If you backed up your list(s) using Method A above, follow these steps to restore them to the new computer:

  1. Select “Restore List from Interlink…” from the “File” menu.
  2. Select the list you wish to restore.
  3. Click the “OK” button to restore the list now.

Repeat steps for each additional list you wish to restore.

If you backed up your list(s) using Method B above, follow these steps to restore them to the new computer:

  1. Select “Restore List…” from the “File” menu.
  2. Browse to the location on your USB, CD-ROM, or other media.
  3. Select the list you wish to restore.
  4. Click the “Open” button.

Repeat steps for each additional list you wish to restore.

Configure printers on the new computer.

Printer settings may be found and configured by selecting “Printer Configuration…” from the “File menu.” If your printer setup will be the same as on the old computer, simply duplicate the settings found there. If you are using new printers, the following thread contains first-time printer setup information: http://forum.ilsw.com/showthread.php?873-How-to-Configure-Printers


Annual Statement of Ownership report

The USPS Statement of Ownership, Management, and Circulation, also known as PS Form 3526, is required by the Post Office annually to show proof of continued eligibility for mailing under a Periodical Permit. Interlink Circulation includes this report and can automatically fill in most of the required information. You can find the Statement of Ownership with the other reports in the Periodical Mail Delivery report category. If you have not printed this report from Interlink Circulation before, some setup is required first to ensure all parts of the form are complete and accurate. To configure the 3526 form, open your Periodical publication in Interlink Circulation then:

  1. Select Configure List… from the File menu
  2. Select the Periodical Mail tab
  3. Click the Contact Information button
  4. Select the Form 3526 tab

The first six sub-tabs shown provide space to enter contact information for the various areas on Form 3526. Each tab has room for one contact – additional contacts should be specified on a separate sheet and attached to the form when filing. Additional required information can be specified under the Misc sub-tab, such as the number of annual issues published, the filing date for PS Form 3526, and the date it will be published in the paper.

The real magic happens under the Totals sub-tab. The second page of PS Form 3526 requires circulation statistics from the issue published nearest to date of filing, in addition to circulation statistics averaged across the previous 12 months of publication. Clicking the Estimate Values button will cause the program to automatically determine what the counts should be based on information it has available. If you like what you see, click the Use Estimates button to copy them into the form. Auto-generated averages will only be accurate on lists that have mailed using Interlink Circulation for 12+ months, but you can manually enter the values based on your own calculations so they print nicely on the form.

It is also important to note that circulation statistics are only available from parts of Interlink Circulation that have been actively and accurately used during the previous 12 month period. This means that non-mail delivery figures such as for racks, dealers and carriers, will only be accurate if you have been using these parts of the program. If not, you can always enter your own numbers prior to printing the report.

Once you’re happy with the setup for PS Form 3526, click the OK button to save your changes then OK again to exit Configure List.

You can now print the completed 3526 form any time and as often as you like. For anyone who may be interested, a blank copy of PS Form 3526 with instructions is available for download from the USPS at http://about.usps.com/forms/ps3526.pdf. If you ran the ownership statement last year from Interlink, this will be an easy process: Open your list

  1. Select File | Configure List | Periodical Mail tab | Contact Information | Form 3526
  2. Verify Information is still accurate on each tab
  3. Update the dates on the Misc tab

Select Totals tab

  1. Beginning Date for Year: = The start of this year’s numbers (likely Oct 2017)
  2. Issue Date for Date: = Last Close Issue you processed  (most recent, ex. 9/30/2018)
  3. Click Estimate Values button (this will put new numbers in the 2(two) Estimates Columns
  4. If the numbers line up with what you expect, click Use Estimates (if not, you can manually enter the numbers you would like to use)

Lastly

  1. Click OK, OK  (yes, you will have to click twice to save changes)
  2. Select Reports…
  3. Current Reports
  4. 3526 Statement of Ownership (should be 1st report in left column)
  5. Print All

Configure label printers

Interlink Circulation allows you to pre-configure output devices for a variety of reports. This means you can set the system up once, and not look at the configuration again until you change or replace one of your printers.

Interlink Circulation supports printing labels to any of the following:

  • Laser printer loaded with 2-up or 3-up Avery adhesive mailing labels.
  • Impact printer (dot matrix) loaded with 1-up, 2-up or 4-up 1” continuous feed mailing labels or other continuous feed paper (e.g. green bar paper).
  • Thermal printer loaded with 1” adhesive mailing labels.
  • CSV (comma separated values) file to be sent to the press for direct application of addresses.

Setting up your Label Printer:

If you are printing to a laser printer:

  1. In the Page Layout drop-down, select the style of label you wish to print on.
  2. Select the destination printer from the Printer Name drop-down.
  3. Check the box next to Preview before printing if you wish to see the labels before printing them.
  4. Un-check the box next to Advanced Driver.

If you are printing to an impact (dot matrix) or thermal printer:

  1. In the Page Layout drop-down, select the style of label you wish to print on.
  2. Select the destination printer from the Printer Name drop-down.
  3. Un-check the box next to Preview before printing. This will not work with a high-speed advanced driver.
  4. Check the box next to Advanced Driver and select your printer from the drop-down. If you are using an unsupported printer, you may still be able to find a driver that works with your printer by checking the Show Unsupported Drivers box.

If you are printing to a file to be sent elsewhere for direct application:

  1. In the Page Layout drop-down, select the top (blank) item to clear the selection.
  2. Un-check the box next to Preview before printing. This will not work when printing to a file.
  3. Un-check the box next to Advanced Driver.
  4. Click the circle to the left of File Name
  5. In the box to the right of File Name, specify the location and name of the file you wish to create when mailing label reports are run. Alternatively, you may click the Browse button to specify the location and name of the file to create.


Keep papers in single ZIP from splitting

Papers from a single ZIP can get split among carrier route sacks and M3D sacks because of the 24-paper minimum rule

By following the steps below, you may use the exemption table entry to keep papers in a single ZIP from splitting.

  1. Go to the File menu
  2. Click on Configure List
  3. Open the Periodical Mail tab
  4. Click on the Customize Sacks/Tubs… button
  5. Open the Exceptions tab
  6. Click Add
  7. Enter ZIPS you would like to keep together in a container
  8. Choose OK to Save

The next time you close an issue, all papers in this ZIP will go into direct sacks. No more splits.

Additional Information:

Using this table creates a container that may otherwise not exist, with the added advantage of improved delivery where DDU’s exist.

Please be advised that a Postal Service representative can request that you change this at any time.

There is no additional cost if the ZIP is in-county. If the ZIP is out-of-county and there isn’t a sack into which the papers will be logically added, the exception table will add a sack at the applicable container price (see Part E of your 3541, sack pricing does not apply to Standard Mail).

Record payments, refunds & adjustments

Overview

The payments tab for a subscriber allows one of three different transactions to be posted to a subscriber account: Payments, Refunds, and Adjustments.

Payments record the amount of money sent from a subscriber, and extend the length of a subscription. Refunds calculate the amount owed to a subscriber, in the event that a subscription must end early. Adjustments allow you to manually specify the renewal date for a subscription without posting any funds to the account.

It is highly recommended that payments be posted in order to extend a subscription rather than posting adjustments to set the renewal date.

Payments

To record (post) a payment to start or extend a subscription:

  1. Double-click the desired subscriber record, or select the subscriber and click the Edit… button.
  2. Click on the Newspaper tab if it is not already selected.
  3. Verify that the rate is set properly for this subscriber by observing the rate drop-down box.
  4. Click on the Payments tab.
  5. Click the Accept Payment button.
  6. Enter your initials in the box labeled Initials.
  7. Verify that the Payment Date is correct. This is usually the current date but can be changed to post the payment for a different day.
  8. Verify that the Calculation Date is correct. This refers to the date from which the new expiration date will be extended and can be changed at any time. By default, active customers will have this set to the current expire date, and expired and inactive customers will have this set to the Payment Date.
  9. If the payment should be posted based on a promotional rate, select the correct rate in the Promotional Rate drop-down box. If none are listed, a promotional rate must first be configured in File | Configure List…
  10. (optional) Enter the check or receipt number as provided by the subscriber.
  11. Enter the amount to be posted to the account. Typically this will be an amount defined for a term of a rate. If the amount entered here is not configured in the rate, you will be prompted to prorate or discount the payment.
  12. Press the Tab key on your keyboard.
  13. (optional) Enter a tip amount to be paid to the newspaper carrier.
  14. Confirm the Calculated Expire Date, the new expire date after posting the payment and click OK.

Refunds

To refund the remaining balance of a subscription:

  1. Double-click the desired subscriber record, or select the subscriber and click the Edit… button.
  2. Click on the Payments tab.
  3. Click the Refund button.
  4. Enter your initials in the box labeled Initials.
  5. Verify that the Payment Date is correct. This is the date the refund will be applied to the account and will usually be the current date, but can be changed to post the refund on a different day.
  6. If desired, change the amount of the remaining balance to be refunded. By default, all remaining funds will be refunded, setting the new expiration date to today’s date.
  7. Click OK to post the refund.


Adjustments

To manually adjust the expiration date for a subscriber:

  1. Double-click the desired subscriber record, or select the subscriber and click the Edit… button.
  2. Click on the Payments tab.
  3. Click the Adjustment button.
  4. Enter your initials in the box labeled Initials.
  5. Verify that the Payment Date is correct. This is the date the adjustment will be recorded to the account and will usually be today’s date.
  6. Select the payment type from the Payment Type drop-down. When set to “Set Renewal Date” you can manually pick the expiration date for the subscription. When set to “Service Credit” you can select how many days to extend the subscription and a new expiration date will be automatically calculated.
  7. Set the new renewal date or number of days to credit the subscription.
  8. Confirm the Calculated Expire Date, the new expire date after posting the payment and click OK.